5. Set Up Guide
5.1. General Set Up Information
5.1.1. The "SetUp" Menu
After choosing the option "SetUp System" from the "Main" menu (compare figure 3.1-1), the "SetUp" menu will be displayed as shown in figure 5.1-1:
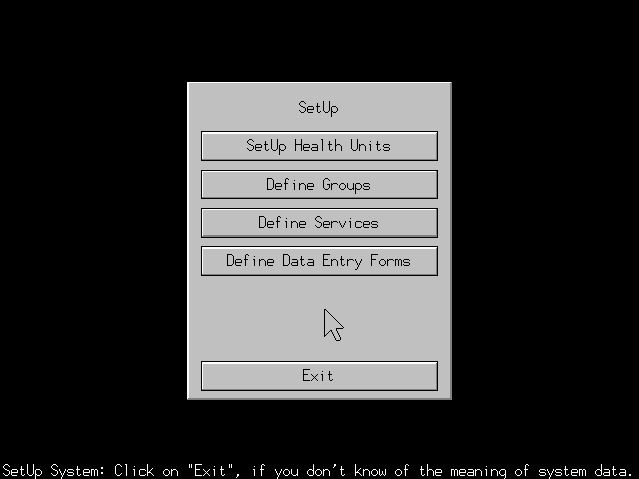
Fig. 5.1-1: The "SetUp" menu gives a choice of options for setting up "Kabarole!".
From the "SetUp" menu you can choose several options for adapting "Kabarole!" to the needs of your
district. The "SetUp" menu consists of a big box in the center of the screen, the message line at the bottom
of the screen and a little arrow, the pointer. When you position the pointer above one option, the message line will contain a short help on that option. You can choose from five options:
5.1.2. The District Map for Setting Up Health Units
After you have chosen the option "SetUp Health Units" from the "SetUp" menu (compare figure 5.1-1),
the district map for setting up health units appears on the screen. It looks similar to the district map for
selecting a single health unit (compare figure 4.1-7). It displays all the heath units which were installed already. From this map you can either select an existing health unit which you want to modify. Or you can
create a new health unit. Of course this map looks different in other districts. Each existing health unit
appears as a little house. When the pointer points at a health unit, the name of the health unit appears in the
message line at the bottom of the screen. Clicking the mouse button on an existing health unit opens the "ModifyUnit" menu on the screen (refer to section 5.1.3. "The "ModifyUnit" Menu). The pointer has to be
positioned correctly with the tip inside the little house, though, as shown in figure 4.1-7.
If you click the mouse button, when the pointer is not on an existing health unit, "Kabarole!" creates a new
health unit at the position of the tip of the pointer. The screen "Edit Baseline Data" from figure 5.1-2 appears on the screen:
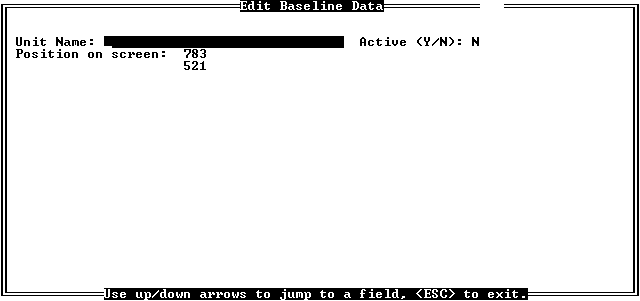
Fig. 5.1-2: The screen "Edit Baseline Data" contains basic information about a health unit.
In the screen "Edit Baseline Data" you can enter the name of the health unit, specify whether it is currently
active and change the coordinates on the district map manually. When the screen appears, the cursor is in the entry field for the name of the health unit. Enter the full name, but make sure that the name is unique.
Otherwise you might confuse it with another health unit later on. Pressing the <Enter> key moves the
cursor to the entry field "Active". Enter "Y", if the health unit picked up service already. Since it is not
necessary to change the coordinates of the health unit, you can leave the screen "Edit Baseline Data" by
pressing the <Esc> key. "Kabarole!" asks whether to save the changes (compare figure 3.1-16). You can
choose "Yes" or "No" by pressing the left / right arrow keys. Choosing "Yes" installs the health unit. It will
be represented by a little house on the district map from now on. Choosing "No" returns to the district map without installing the health unit. The total number of health units must not exceede 70.
You can leave the screen with the district map by pressing the <Esc> key. This returns you to the "SetUp" menu (compare figure 5.1-1).
5.1.3. The "ModifyUnit" Menu
After selecting an existing health unit from the district map (compare section 5.1.2 "The District Map for
Setting Up Health Units") the "ModifyUnit" menu appears on the screen as shown in figure 5.1-3:
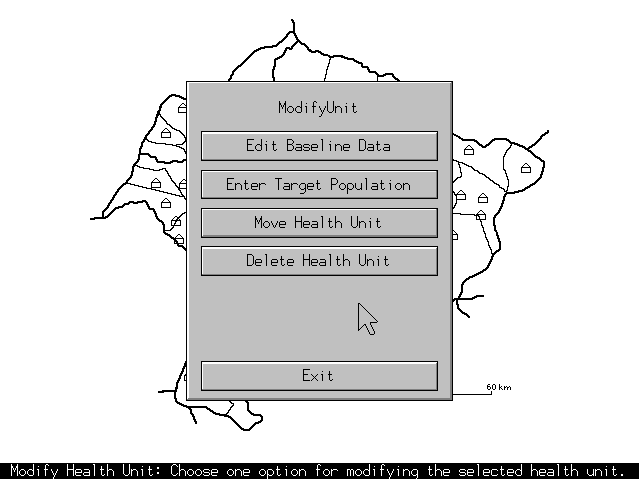
Fig. 5.1-3: The "ModifyUnit" menu gives a choice of options for modifying an existing health unit.
From the "ModifyUnit" menu you can choose several options for modifying the selected health unit. The
"ModifyUnit" menu consists of a big box in the center of the screen, the message line at the bottom of the
screen and a little arrow, the pointer. In the background you can still see the district map. When you position the pointer above one option, the message line will contain a short help on that option. You can
choose from five options:
- Choose "Edit Baseline Data" to change the name or activity status of the health unit. "Kabarole!"
displays the screen "Edit Baseline Data" (compare figure 5.1-2). Don't use this option to replace
one health unit with another. The name of an health unit is meaningless to "Kabarole!". If you change the name, "Kabarole!" will still connect all the old reports to this health unit.
- Choose "Enter Target Population" to assign services to the health unit and to enter the target population for each service. Refer to section 5.1.4. "Target Populations of a Health Unit".
- Choose "Move Health Unit" to change the position of the health unit on the district map. "Kabarole!" returns to the district map. There you can move the health unit to the desired position
by moving the mouse. Pressing the <Esc> key returns the health unit to the original position. Clicking the mouse button fixes the health unit at the new position. After that you continue from the
district map as described in section 5.1.2. "The District Map for Setting Up Health Units".
- Choose "Delete Health Unit" to remove the health unit from the district map. Be aware, though, that
deleting a health unit also deletes all the reports which have been entered for this unit already. Use this option only, when you have created a health unit accidentally. If you want to remove a health
unit which is not active any more, you should mark it as inactive in the screen "Edit Baseline Data" (compare figure 5.1-2). The warning from figure 5.1-4 reminds you of this:
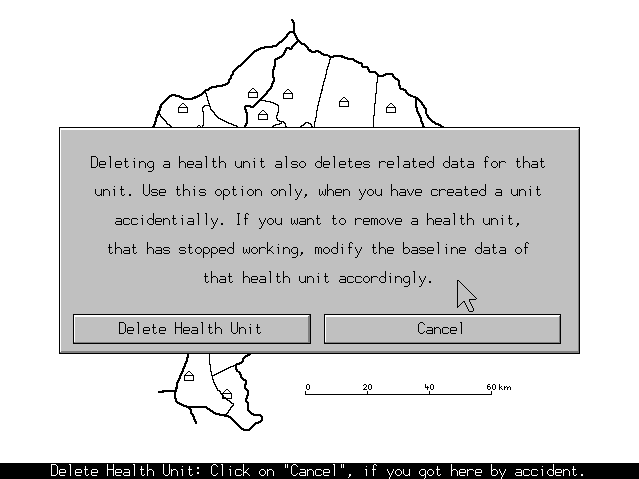
Fig. 5.1-4: A warning has to be confirmed before a health unit can be deleted.
Click on "Delete Health Unit", if you want to delete the health unit anyway. "Kabarole!" deletes the health
unit and all the related information. Clicking on "Cancel" or pressing the <Esc> key leaves the health unit on the district map. After both options "Kabarole!" returns to the district map.
- Choose "Exit" when you want to return to the district map to select another health unit. Instead of choosing this option you can also press the <Esc> key.
5.1.4. Target Populations of a Health Unit
After you have chosen the option "Enter Target Population" from the "ModifyUnit" menu (compare figure
5.1-3) "Kabarole!" displays the screen "Enter Target Population" as shown in figure 5.1-5:
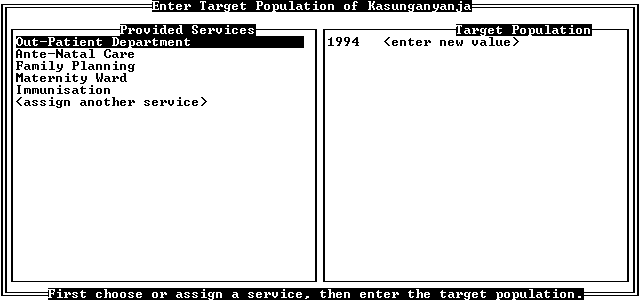
Fig. 5.1-5: The screen "Enter Target Population" allows the assignment of target populations to a provided service.
The screen "Enter Target Population" contains two boxes. The box "Provided Services" lists the services
which were assigned to the health unit already. The other box, "Target Population" lists the number of
people which is targeted by a specific service for each year. "Kabarole!" assumes that the target
population of a health unit is defined each year afresh for each service. When a service is highlighted in the
"Provided Services" box, you can see the Target populations for that service in the "Target Population"
box. However, the current version of "Kabarole!" does not support target populations in other parts of the program. That is the reason, why in figure 5.1-5 no target population has been entered.
As you press the up / down arrow keys, you will highlight another service. At the same time, the "Target
Population" box will be updated. If, in the example from figure 5.1-5, you press the down arrow key, the
service "Ante-Natal Care" will be highlighted, and the "Target Population" box will contain the target
population of the health unit "Kasunganyanja" for ante-natal care. As you press the <Enter> or the right
arrow key, the highlighted bar moves to the target population of the first year in the "Target Population"
box. There you can also highlight the target population of another year by pressing the up / down arrow keys. Pressing the <Esc> key or the left arrow key returns the highlighted bar back to the "Provided
Services" box without affecting the target population. Pressing the <Enter> key enables you to modify the
highlighted target population. If you press the <Enter> key, when the option "enter new value" is highlighted, you can enter a new value. Also, a new line for the next year will be appended.
If you highlight the option "assign another service" in the "Provided Services" box, the list of available
services (compare figure 3.1-7) appears on the screen. The list contains all services which were not assigned, yet. You can assign another service from the list of available services by highlighting it and
pressing the <Enter> key. If all the available services were assigned already, the message from figure 5.1-6 will appear on the screen:

Fig. 5.1-6: "Kabarole!" displays a message when there is no more health service available for assignment to a health unit.
You can assign only services which have been defined before. Refer to sections 5.1.6. "Service Definitions" and 5.4. "Defining Services", if you want to define a new service. If you press the <Del> key
on a highlighted service in the "Provided Services" box, you can remove that service from the list of
provided services of the current health unit. The message from figure 5.1-7 warns you of the loss of the according entries on target populations:

Fig. 5.1-7: Removal of a service from the list of provided services of a health unit has to be confirmed.
Pressing the <Esc> key while the highlighted bar is in the "Provided Services" box causes "Kabarole!" to
return to the district map for setting up health units. You can continue your work as described in section
5.1.2. "The District Map for Setting Up Health Units".
5.1.5. Group Definitions
You can structure the health units of your district into different groups according to a specific category.
This is necessary, when you want to reduce the calculation of a summary report or the export of data to a selection of health units (compare chapter 4. "Data Presentation Guide"). E.g. if it is necessary to create
different summary reports for each county of a district, create the category "Counties". You can define the
counties as groups of the category "Counties". Then you can assign the health units to the counties. After
choosing the option "Define Groups" from the "SetUp" menu (compare figure 5.1-1), "Kabarole!" displays the screen "Define Groups of Health Units" as shown in figure 5.1-8:
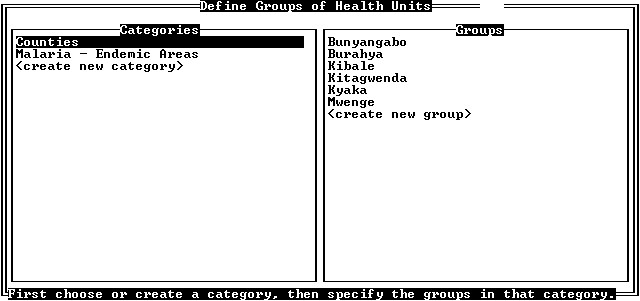
Fig. 5.1-8: The screen "Define Groups of Health Units" is used to define categories and groups for structuring health units.
The screen contains two boxes: one box is named "Categories", the other is named "Groups". Each group
belongs to a category. When a category is highlighted in the "Categories" box, you can see the groups that
belong to that category listed in the "Groups" box. In the example used in figure 5.1-8 you will find the
groups "Bunyangabo", "Burahya", "Kibale", "Kitagwenda", "Kyaka" and "Mwenge" in the "Groups" box.
All these belong to the category "Counties" which is highlighted in the "Categories" box..
As you press the up / down arrow keys, you will highlight another category. At the same time, the
"Groups" box will be updated. If, in the above example, you press the down arrow key, the category
"Malaria - Endemic Areas" will be highlighted, and the "Groups" box will contain the groups
"Hyperendemic Malaria Area", "Hypoendemic Malaria Area" and "Mesoendemic Malaria Area". As you
press the <Enter> or the right arrow key, the highlighted bar moves to the first group in the "Groups" box.
If you press the <Enter> key while the option "create new category" is highlighted, you can enter the name
of a new category at that position. After entering the new category, the highlighted bar moves to the option "create new group".
In the "Groups" box, you can also highlight another group by pressing the up / down arrow keys. Pressing
the <Esc> key or the left arrow key returns the highlighted bar back to the "Categories" box without
selecting a group. Pressing the <Enter> key selects the highlighted group for the assignment of health units
to that group. When you press the <Enter> key on the option "create new group", you can enter the name
of the new group at that position. The group is selected for the assignment of health units automatically. In both cases the district map for assigning health units to a group is displayed on the screen as shown in
figure 5.1-9:
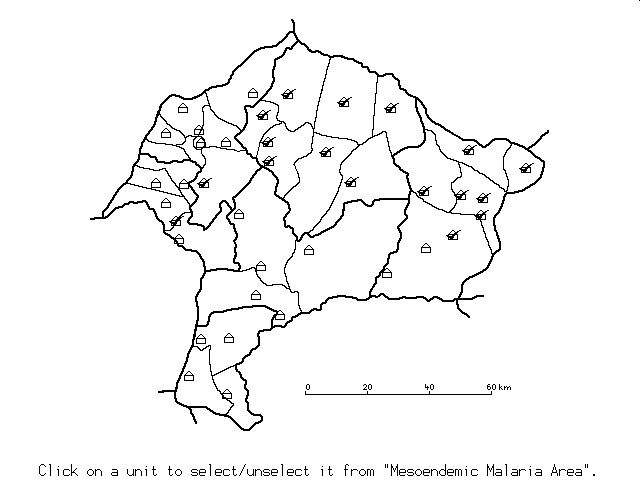
Fig. 5.1-9: The district map for assigning health units to a group.
On the district map you can mark the health units which belong to the selected group. In figure 5.1-9 this is
the group "Mesoendemic Malaria Area" from the category "Malaria - Endemic Areas". Of course the map
looks different in other districts. Each existing health unit appears as a little house. When the pointer points
at a health unit, the name of the health unit appears in the message line at the bottom of the screen. The health units which already belong to the selected group are marked. Clicking the mouse button on a
marked health unit removes the health unit from the selected group. Clicking the mouse button on a health unit which is not marked adds the health unit to that group. The pointer has to be positioned correctly with
the tip inside the little house, though, as shown in figure 4.1-7. You can leave the district map for assigning
health units to a group by pressing the <Esc> key. "Kabarole!" returns to the screen "Define Groups of Health Units" (compare figure 5.1-8).
You can delete a category by pressing the <Del> key when the category is highlighted. "Kabarole!" asks
you to confirm the action with the message from figure 5.1-10. After confirmation the category will be deleted. All the groups which belong to that category will be deleted and also the assignments of health
units to the groups.

Fig. 5.1-10: The decision to delete a category has to be confirmed.
You can delete a group by pressing the <Del> key when the group is highlighted. "Kabarole!" asks you to
confirm the action with a similar message as in figure 5.1-10. After confirmation the group will be deleted.
All the assignments of health units to the group will be deleted, too. You can leave the screen "Define
Groups of Health Units" by pressing the <Esc> key when the highlighted bar is in the "Categories" box. "Kabarole!" returns to the "SetUp" menu (compare figure 5.1-1).
5.1.6. Service Definitions
You can structure the health units of your district according to the services they provide. This is necessary,
when you want to reduce the calculation of a summary report or the export of data to health units which offer a specific health service (compare chapter 4. "Data Presentation Guide"). E.g. it is necessary to
create summary reports for a form, which is only used by the health units which provide ante-natal care
services. You can define the service "Ante-Natal Care" and specify the health units providing that service.
After choosing the option "Define Services" from the "SetUp" menu (compare figure 5.1-1), "Kabarole!"
displays the screen "Define Services of the Health Units" as shown in figure 5.1-11:
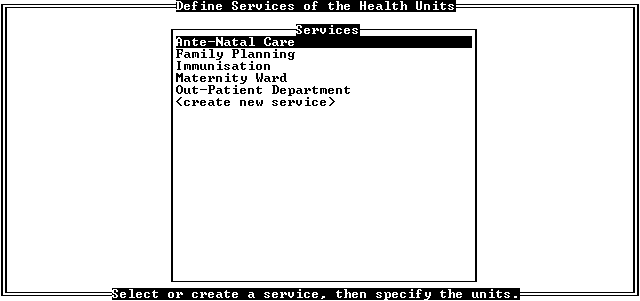
Fig. 5.1-11: The screen "Define Services of the Health Units" is used to define the health services which are provided by the health units.
The screen contains the "Services" box. In the "Services" box the services are listed, which were defined
already. When you enter the screen, the first service is highlighted. When you press the <Enter> key, you
select the highlighted service for the assignment of health units. As you press the up / down arrow keys,
you will highlight another service. If you press the <Enter> key while the option "create new service" is
highlighted, you can enter the name of a new service at that position. After entering, the service is selected
for the assignment of health units automatically. The district map for assigning health units to a service is
displayed on the screen in both cases. It looks similar to the district map for assigning health units to a group (compare figure 5.1-9).
On the district map you can mark the health units which provide the selected service. Of course the map
looks different in other districts. Each existing health unit appears as a little house. When the pointer points
at a health unit, the name of the health unit appears in the message line at the bottom of the screen. The health units which already belong to the selected service are marked. Clicking the mouse button on a
marked health unit removes the health unit from the selected service. Clicking the mouse button on a health unit which is not marked adds the health unit to that service. The pointer has to be positioned correctly
with the tip inside the little house, though, as shown in figure 4.1-7. You can leave the district map for
assigning health units to a service by pressing the <Esc> key. "Kabarole!" returns to the screen "Define services of the Health Units" (compare figure 5.1-11).
You can delete a service by pressing the <Del> key when the service is highlighted. "Kabarole!" asks you
to confirm the action with the message from figure 5.1-12. After confirmation the service will be deleted.
All the assignments of health units to that service will be deleted and also all the target populations for this service (compare section 5.1.4. "Target Populations of a Health Unit").

Fig. 5.1-12: The decision to delete a service has to be confirmed.
After deletion of the service, "Kabarole!" returns the highlighted bar to the "Services" box. You can leave
the screen "Define Services of the Health Units" by pressing the <Esc> key. "Kabarole!" returns to the "SetUp" menu (compare figure 5.1-1).
5.1.7. Form Definitions
Before you can enter data into the computer with "Kabarole!", you must define data entry forms. The same data entry form is used to enter data (compare chapter 3. "Data Entry Guide"), to calculate summary
reports and to export data (compare chapter 4. "Data Presentation Guide"). You cannot define forms with
"Kabarole!", you can only install forms which were predefined with the "EpiInfo" modules "Eped" (the
"EpiInfo" editor) and "Enter" (the "EpiInfo" data entry module). With "Eped" you must create a questionnaire file first (compare section 5.1.8. "The 'EpiInfo' Questionnaire Files"). This questionnaire file has to be transformed into a record file afterwards (compare section 5.1.9 "The 'EpiInfo' Record Files")
using the "Enter" module. The "EpiInfo" record file for installation in "Kabarole!" has to be copied into the "Kabarole!" directory "EPI-REC".
After choosing the option "Define Data Entry Forms" from the "SetUp" menu (compare figure 5.1-1),
"Kabarole!" displays the screen "Define Forms for Data Entry" as shown in figure 5.1-13:
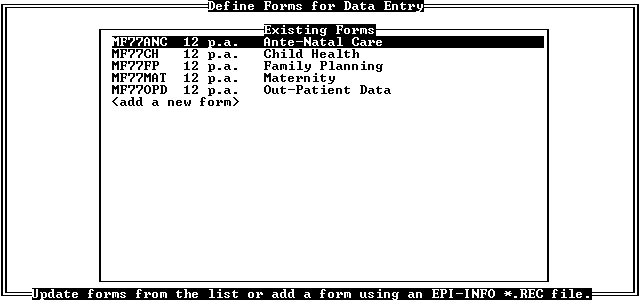
Fig. 5.1-13: The forms which are used by "Kabarole!" can be installed from the screen "Define Forms for Data Entry".
The screen contains the "Existing Forms" box. In the "Existing Forms" box the forms are listed, which were
installed already. One line contains the short name of the form, the information how many reports are entered for this form per year and the descriptive name of the form. When you enter the screen, the first
form is highlighted. If you press the <Enter> key, the form is selected for updating. However, updating requires a thorough knowledge of the structure of the "EpiInfo" record files (compare section 5.1.9. "The 'EpiInfo' Record Files") and careful implementation. As you press the up / down arrow keys, you will
highlight another form. If you press the <Enter> key while the option "add a new form" is highlighted, you
can install a new form in "Kabarole!". In both cases "Kabarole!" displays the list of "EpiInfo" record files
which are available in the "Kabarole!" directory "EPI-REC". For updating, only the "EpiInfo" record file
with the same name as the selected form appears in the list. Figure 5.1-14 shows what the list of available forms could look:
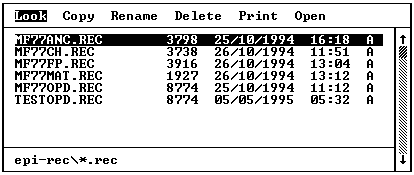
Fig. 5.1-14: From the list of available "EpiInfo" record files, the file for adding a new form can be chosen.
The box which contains the list of available "EpiInfo" record files also contains a set of options. Since only
the option "Open" is of importance, the other options are not explained in this manual. When the box is
opened, the first file and the option "Look" is highlighted. Pressing the up / down arrow keys highlights
other files, pressing the left / right arrow keys highlights another option. Pressing the <Enter> key executes the highlighted option with the highlighted file.
To install or update a form highlight the "EpiInfo" record file which contains the definitions for the form.
Also highlight the option "Open". After pressing the <Enter> key "Kabarole!" inserts the file name of the
selected file as short name of the new form. The cursor moves to the entry field for the frequency of the
reports for the new form. Enter "12" if you have a monthly report. After entering the frequency, the cursor
moves to the entry field for the descriptive name of the newly entered form. After entering the descriptive
name, "Kabarole!" starts the installation or the update. The little spinning bar in the top right corner of the
screen "Define Forms for Data Entry" indicates, that "Kabarole!" is still busy loading. After completion you can continue your work in the screen "Define Forms for Data Entry".
You can delete a form from the list of existing forms by pressing the <Del> key when the form is
highlighted. "Kabarole!" asks you to confirm the action with the message from figure 5.1-15:

Fig. 5.1-15: Removal of an existing form has to be confirmed.
After confirmation "Kabarole!" checks, whether the form was used for data entry already. You cannot
delete a form, for which reports were entered already. If "Kabarole!" detects reports, which belong to that
form, the message from figure 5.1-16 is displayed. The message informs you, that the deletion of forms which are in use is impossible:

Fig. 5.1-16: Removal of used forms is impossible.
After deletion of the form, "Kabarole!" returns the highlighted bar to the "Existing Forms" box. You can
leave the screen "Define Forms for Data Entry" by pressing the <Esc> key. "Kabarole!" returns to the "SetUp" menu (compare figure 5.1-1).
5.1.8. The "EpiInfo" Questionnaire Files
Before a new form can be installed in "Kabarole!", it has to be designed with a text editor such as "Eped",
the "EpiInfo" text editor. It has to be stored as an "EpiInfo" questionnaire file with the file name extension
"QES", e.g. "MF77OPD.QES". It is suggested that you store the questionnaire files, which you create for
later installation with "Kabarole!", in the "Kabarole!" directory "EPI-REC". The questionnaire file must be
transformed by the "Enter" module of "EpiInfo". Only the resulting "EpiInfo" record file can be installed by "Kabarole.
Designing an "EpiInfo" questionnaire file for the use as "Kabarole!" form basically follows the same rules as
designing a normal "EpiInfo" questionnaire file. Refer to the "EpiInfo" documentation for further information
on standard questionnaire files. The following exemptions have to be made when you design a questionnaire file for the use as "Kabarole!" form:
- "Kabarole!" supports only numeric fields of ten digits or less. Decimals are not supported. Numeric
fields are defined with the "#" symbol. One symbol stands for one digit. Any other field will be regarded as normal textual information.
- The more entry fields you include into your questionnaire, the weaker is the performance of "Kabarole!". As a rule, the number of entry fields should not exceed 200. More entry fields are
possible, but slow down the data entry module of "Kabarole!" unacceptably. If want to map very large paper report forms, break them into smaller portions and design and install them as separate
questionnaire files.
- Always try to make the questionnaire look like the original paper report form. This makes it easier to enter data.
- Do not exceed a line length of 78 characters.
- Since the design is also used for printing the summary reports, you should be aware that "Kabarole!" adds a header of seven lines into the summary report. To keep the output limited to one
page, you must recognize the maximum number of lines, you can print on one page with your printer. Usually you should limit the questionnaire file to 65 lines.
- If you update an existing form, you must be very careful not you change textual information, which is used by "EpiInfo" to create variable names. An unwillingly changed variable name would lead to
inconsistent data structures in the "Kabarole!" data file. Updating an existing form always requires
careful inspection of the "EpiInfo" record file, to ensure that a variable name was not changed by accident (compare section 5.1.9. "The 'EpiInfo' Record Files").
The example in figure 5.1-17 contains a short version of an "EpiInfo" questionnaire file for the later use as "Kabarole!" form:
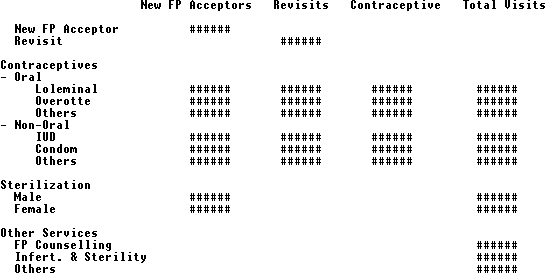
Fig. 5.1-17: A short version of an "EpiInfo" questionnaire file.
5.1.9. The “EpiInfo” Record Files
After an "EpiInfo" questionnaire file was created (compare section 5.1.8. "The 'EpiInfo' Questionnaire Files"), it has to be transformed into an "EpiInfo" record file. Only the record file can be installed by
"Kabarole!". The transformation is done by the "Enter" module of "EpiInfo". Refer to the "EpiInfo" documentation for more detailed information on the "Enter" module.
Start the "Enter" module with the option for creating a new record file from a questionnaire file. As name
for the record file you must choose the name that you want to appear as the short name of the form in "Kabarole!" (compare section 5.1.7. "Form Definitions"). After starting the "Enter" module, "EpiInfo" will
convert the questionnaire file into the record file. When the process is completed, you will see the data entry screen of the "Enter" module of "EpiInfo" as shown in figure 5.1-18:
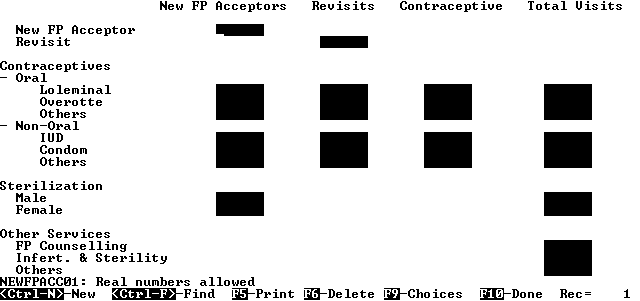
Fig. 5.1-18: The data entry screen of the "Enter" module of "EpiInfo" with the newly created record file.
In the lower left corner of the data screen you can see the variable name of the entry field which contains
the the cursor. If you plan to update an existing "Kabarole!" form with this record file, you can check here,
whether the updated variable names correspond with the variable names, that already exist in the former version of the form. Leave the data entry screen without entering data by pressing the <F10> key. The
record file will be saved with the extension "REC" automatically.
If you read the record file with a text editor like "Eped", you will get a text similar to the one displayed in
figure 5.1-19. Figure 5.1-19 shows the record file of the questionnaire file from figure 5.1-17. Here you
can change a variable name manually, if it was not updated as you wanted. The " ' " symbol in figure
5.1-19 indicates empty spaces in the original file. For detailed information about the structure of an record field, refer to the "EpiInfo" documentation.
The number in the first line of the record file tells how many lines are used for describing the structure of
the questionnaire file. Each other line contains the definitions for an entry field, for textual information or for
both. Be aware that, if you change any information of one entry field, you have to maintain the exact layout of the record file. In the first column of each line, you find the name of the entry. If the line contains
information on an entry field, this is the name of the entry field. The seventh and eighth columns specify, whether a numerical entry field or pure textual information is described. If the seventh column contains a
zero or a six and the eighth column a value greater than zero, the line describes a numerical field. The tenth
column contains the textual information, which is displayed in front of the entry field. If the eighth column contains a zero, the line describes pure textual information.
39'1
'NEWFPACCEP'''21'''1''30''79'''1'''0'''0'112'New'FP'Acceptors'''Re...
'NEWFPACC01''''3'''3''30''28'''3'''6'''6'112'New'FP'Acceptor

                            'REVISIT'''''''3'''4''30''41'''4'''6'''6'112'Revisit
'CONTRACEPT''''1'''6''30''15'''6'''0'''0'112'Contraceptives
'ORAL''''''''''1'''7''30'''7'''7'''0'''0'112'-'Oral

                            'LOLEMINAL'''''6'''8''30''28'''8'''6'''6'112'Loleminal
'LOLEMINAL1'''41'''8''30''41'''8'''6'''6'112''
'LOLEMINAL2'''54'''8''30''54'''8'''6'''6'112''
'LOLEMINAL3'''69'''8''30''69'''8'''6'''6'112''

                            'OVEROTTE''''''6'''9''30''28'''9'''6'''6'112'Overotte
'OVEROTTE1''''41'''9''30''41'''9'''6'''6'112''
'OVEROTTE2''''54'''9''30''54'''9'''6'''6'112''
'OVEROTTE3''''69'''9''30''69'''9'''6'''6'112''

                            'OTHERS''''''''6''10''30''28''10'''6'''6'112'Others
'OTHERS1''''''41''10''30''41''10'''6'''6'112''
'OTHERS2''''''54''10''30''54''10'''6'''6'112''
'OTHERS3''''''69''10''30''69''10'''6'''6'112''

                            'NONORAL'''''''1''11''30''11''11'''0'''0'112'-'Non-Oral
'IUD'''''''''''6''12''30''28''12'''6'''6'112'IUD
'IUD1'''''''''41''12''30''41''12'''6'''6'112''
'IUD2'''''''''54''12''30''54''12'''6'''6'112''

                            'IUD3'''''''''69''12''30''69''12'''6'''6'112''
'CONDOM''''''''6''13''30''28''13'''6'''6'112'Condom
'CONDOM1''''''41''13''30''41''13'''6'''6'112''
'CONDOM2''''''54''13''30''54''13'''6'''6'112''

                            'CONDOM3''''''69''13''30''69''13'''6'''6'112''
'OTHERS01''''''6''14''30''28''14'''6'''6'112'Others
'OTHERS21'''''41''14''30''41''14'''6'''6'112''
'OTHERS22'''''54''14''30''54''14'''6'''6'112''

                            'OTHERS23'''''69''14''30''69''14'''6'''6'112''
'STERILIZAT''''1''16''30''14''16'''0'''0'112'Sterilization
'MALE''''''''''3''17''30''28''17'''6'''6'112'Male
'MALE1''''''''69''17''30''69''17'''6'''6'112''

                            'FEMALE''''''''3''18''30''28''18'''6'''6'112'Female
'FEMALE1''''''69''18''30''69''18'''6'''6'112''
'OTHERSERVI''''1''20''30''15''20'''0'''0'112'Other'Services

                            'FPCOUNSELL''''3''21''30''69''21'''6'''6'112'FP'Counselling
'INFERTSTER''''3''22''30''69''22'''6'''6'112'Infert.'&'Sterility
'OTHERS02''''''3''23''30''69''23'''6'''6'112'Others
Fig. 5.1-19: This record file was created from the questionnaire file from figure 5.1-17 using the "Enter"
module from "EpiInfo". For better visualization, the empty spaces from the original file were placed by the "'" symbol in this figure.
If you compare the file structure of the record file in figure 5.1-19 to the questionnaire file from figure
5.1-17, you will be able to see how "EpiInfo" generates variable names. You will find some specialities, which you have to recognize, when you update existing "Kabarole!" forms:
- Since textual information receives a name, also, the name for the entry field for new family planning acceptors is not "NEWFPACCEP" as expected. It is "NEWFPACC01", since the header already
received the name "NEWFPACCEP".
- If you have several entry fields in one line with no textual information in between, a number will be added to the name. In figure 5.1-19 the entry fields for condoms have been named "CONDOM",
"CONDOM1" to "CONDOM3". "CONDOM3" is the entry field for the total number of condoms
distributed. If in an update version of the questionnaire file you take out the column "Contraceptive",
only three entry fields for condoms will be left. They will be named "CONDOM", "CONDOM1"
and "CONDOM2". Now the entry field for the total number of condoms is "CONDOM2". You
have to change the name back to "CONDOM3". Otherwise your "Kabarole!" database will use one entry field for two different kinds of entries.
- If "EpiInfo" detects entry fields with the same name, although they are not in the same line, it also numerates the names. However, this numeration can be very chaotic. If you update forms like that,
you have to be very careful, when you change the names of the entry fields. E.g. in figure 5.1-17 you can find three sets of entry fields of the kind "Others". These have been transformed in the
following way:
- Those from the section "Contraceptives - Oral" were named to "OTHERS" and "OTHERS1" to "OTHERS3".
- Those from the section "Contraceptives - Non-Oral" were named to "OTHERS01", "OTHERS21", "OTHERS22" and "OTHERS23".
- The one from section "Other Services" was named to "OTHERS02".
Resulting from this, you should always denote the names of entry fields after creating a new form. This will
help you to evaluate export files with the "Analysis" module of "EpiInfo" and to avoid errors when updating a form.
5.2. Setting Up Health Units
5.2.1.  - Creating a New Health Unit - Creating a New Health Unit
For this example, the following assumption has been made:
- A new health unit was opened in the district. It has to be installed in "Kabarole!".
Starting from the "SetUp" menu (compare figure 5.1-1), you have to take the following steps to create a new health unit:
1. Choose the option "SetUp Health Units" from the "SetUp" menu. "Kabarole!" will display the district map for setting up health units (compare section 5.1.2. "The District Map for Setting Up Health Units").
2. Move the pointer to the position on the map where you want to create the health unit.
3. Click the mouse button. "Kabarole!" will display the screen "Edit Baseline Data" (compare figure 5.1-2).
4. Enter the name of the health unit. "Kabarole!" will move the cursor to the entry field for the activity status of the health unit.
5. Enter "Y" for the activity status. "Kabarole!" will move the cursor to the entry fields for the coordinates.
6. Press <Esc> to leave the screen "Edit Baseline Data". "Kabarole!" will ask you whether to save the changes (compare figure 3.1-16).
7. Choose "Yes" on the question whether to save the changes. "Kabarole!" will:
- Install the health unit at the position, where the mouse pointer was.
- Return to the district map for setting up health units.
8. Press <Esc> to leave the district map for setting up health units. "Kabarole!" will return to the "SetUp" menu.
Additionally:
9. Assign the provided services to the new health unit. Compare section 5.4.2. "Assigning Health Units to a Service".
10. Assign the health unit to the according groups. Compare section 5.3.2. "Assigning Health Units to a Group".
5.2.2.  - Editing Baseline Data of a Health Unit - Editing Baseline Data of a Health Unit
For this example, the following assumptions have been made:
- An existing health unit was shut down. It has to be marked as inactive.
- The health unit was installed in "Kabarole!" already.
Starting from the "SetUp" menu (compare figure 5.1-1), you have to take the following steps to modify the baseline data of the health unit:
1. Choose the option "SetUp Health Units" from the "SetUp" menu. "Kabarole!" will display the district map for setting up health units (compare section 5.1.2. "The District Map for Setting Up Health Units").
2. Click the mouse button on the health unit. "Kabarole!" will display the "ModifyUnit" menu (compare figure 5.1-3)
3. Choose the option "Edit Baseline Data" from the "ModifyUnit" menu. "Kabarole!" will display the screen "Edit Baseline Data" (compare figure 5.1-2).
4. Press <Enter> in the entry field for the name. "Kabarole!" will move the cursor to the entry field for the activity status of the health unit.
5. Enter "N" for the activity status. "Kabarole!" will move the cursor to the entry fields for the coordinates.
6. Press <Esc> to leave the screen "Edit Baseline Data". "Kabarole!" will ask you whether to save the changes (compare figure 3.1-16).
7. Choose "Yes" on the question whether to save the changes. "Kabarole!" will return to the district map for setting up health units.
8. Press <Esc> to leave the district map for setting up health units. "Kabarole!" will return to the "SetUp" menu.
5.2.3.  - Entering Target Populations for a Service - Entering Target Populations for a Service
For this example, the following assumptions have been made:
- The target populations for a health unit have to be recorded in "Kabarole!".
- The health unit was installed in "Kabarole!" already.
- The health services which are provided in the district have been installed already.
Starting from the "SetUp" menu (compare figure 5.1-1), you have to take the following steps to enter the target populations of the health unit:
1. Choose the option "SetUp Health Units" from the "SetUp" menu. "Kabarole!" will display the district map for setting up health units (compare section 5.1.2. "The District Map for Setting Up Health Units").
2. Click the mouse button on the health unit. "Kabarole!" will display the "ModifyUnit" menu (compare figure 5.1-3)
3. Choose the option "Enter Target Population" from the "ModifyUnit" menu. "Kabarole!" will
display the screen "Enter Target Population" (compare figure 5.1-5).
4. Highlight the service for which you want to enter the target population in the "Provided Services" box.
"Kabarole!" will display the target populations of that service in the "Target Population" box.
5. Press <Enter>. "Kabarole!" will highlighted the first line in the "Target Population" box.
6. Highlight the year for which you want to enter the target population in the "Target Population" box.
7. Press <Enter>. "Kabarole!" will move the cursor to the entry field for the target population of the selected year.
8. Enter the target population for the selected year. If you have entered the target population for the last displayed year, "Kabarole!" will add a new line for the following year.
9. Press <Esc> to return to the "Provided Services" box. "Kabarole!" will move the highlighted bar to the selected service in the "Provided Services" box.
10. Press <Esc> to leave the screen "Enter Target Population". "Kabarole!" will return to the district map for setting up health units.
11. Press <Esc> to leave the district map for setting up health units. "Kabarole!" will return to the "SetUp" menu.
5.2.4.  - Moving a Health Unit - Moving a Health Unit
For this example, the following assumption has been made:
- A health unit was installed at the wrong position on the district map. The position has to be corrected.
Starting from the "SetUp" menu (compare figure 5.1-1), you have to take the following steps to move the health unit:
1. Choose the option "SetUp Health Units" from the "SetUp" menu. "Kabarole!" will display the district map for setting up health units (compare section 5.1.2. "The District Map for Setting Up Health Units").
2. Click the mouse button on the health unit. "Kabarole!" will display the "ModifyUnit" menu (compare figure 5.1-3)
3. Choose the option "Move Health Unit" from the "ModifyUnit" menu. "Kabarole!" will display
the message "Move [name of health unit]: Click to place the unit at the current position." in the message line.
4. Move the health unit to the correct position.
5. Click the mouse button to fix the unit at the correct position.
6. Press <Esc> to leave the district map for setting up health units. "Kabarole!" will return to the "SetUp" menu.
5.2.5.  - Deleting a Health Unit - Deleting a Health Unit
For this example, the following assumption has been made:
Starting from the "SetUp" menu (compare figure 5.1-1), you have to take the following steps to delete the health unit:
1. Choose the option "SetUp Health Units" from the "SetUp" menu. "Kabarole!" will display the district map for setting up health units (compare section 5.1.2. "The District Map for Setting Up Health Units").
2. Click the mouse button on the health unit. "Kabarole!" will display the "ModifyUnit" menu (compare figure 5.1-3).
3. Choose the option "Delete Health Unit" from the "ModifyUnit" menu. "Kabarole!" will display a warning on the screen (compare figure 5.1-4).
4. Choose the option "Delete Health Unit" from the warning. "Kabarole!" will:
- Delete all the connected information of the health unit.
- Delete the health unit.
- Return to the district map for setting up health units.
5. Press <Esc> to leave the district map for setting up health units. "Kabarole!" will return to the "SetUp" menu.
5.3. Defining Groups
5.3.1.  - Creating New Categories and Groups - Creating New Categories and Groups
For this example, the following assumptions have been made:
- The district health team wants data presentation stratified by supervisory areas. Therefor the supervisory areas have to be installed as groups.
- Each district supervisor is assigned to a specific set of health units.
- The health units have been installed in "Kabarole!" already.
Starting from the "SetUp" menu (compare figure 5.1-1), you have to take the following steps to structure the health units according to supervisory areas:
1. Choose the option "Define Groups" from the "SetUp" menu. "Kabarole!" will display the screen "Define Groups of Health Units" (compare figure 5.1-8).
2. Press <Enter> when the option "create new category" is highlighted in the "Categories" box.
"Kabarole!" will replace the option "create new category" with the entry field for the name of the new category.
3. Enter the name "Supervisory Areas" for the new category. "Kabarole!" will highlight the option "create new group" in the "Groups" box.
4. Press <Enter> when the option "create new group" is highlighted in the "Groups" box.
"Kabarole!" will replace the option "create new group" with the entry field for the name of the new group.
5. Enter a name for the new supervisory area. "Kabarole!" will display the district map for assigning health units to a group (compare figure 5.1-9).
6. Click the mouse button on each health unit, which belongs to the supervisory area. "Kabarole!" will mark the selected health units on the district map.
7. Press <Esc> to leave the district map. "Kabarole!" will return to the screen "Define Groups of Health Units".
8. Repeat steps 4 to 7 for each supervisory area.
9. Press <Esc> to leave the "Groups" box. "Kabarole!" will return the highlighted bar to the category "Supervisory Areas".
10. Press <Esc> to leave the screen "Define Groups of Health Units". "Kabarole!" will return to the "SetUp" menu.
5.3.2.  - Assigning Health Units to a Group - Assigning Health Units to a Group
For this example, the following assumptions have been made:
- A newly installed health unit has to be assigned to the groups, to which it belongs.
- The groups have been installed in "Kabarole!" already.
- The health units have been installed in "Kabarole!" already.
Starting from the "SetUp" menu (compare figure 5.1-1), you have to take the following steps to assign a health unit to a group:
1. Choose the option "Define Groups" from the "SetUp" menu. "Kabarole!" will display the screen "Define Groups of Health Units" (compare figure 5.1-8).
2. Highlight the category of the desired group in the "Categories" box. "Kabarole!" will display the according groups in the "Groups" box.
3. Press <Enter> when the correct category is highlighted. "Kabarole!" will highlight the first group of that category.
4. Press <Enter> when the desired group is highlighted in the "Groups" box. "Kabarole!" will
display the district map for assigning health units to a group (compare figure 5.1-9).
5. Click the mouse button on the new health unit. "Kabarole!" will mark the health unit on the district map.
7. Press <Esc> to leave the district map. "Kabarole!" will return to the screen "Define Groups of Health Units".
8. Press <Esc> to leave the "Groups" box. "Kabarole!" will return the highlighted bar to the "Categories" box.
9. Repeat steps 2 to 8 for each category.
10. Press <Esc> to leave the screen "Define Groups of Health Units". "Kabarole!" will return to the "SetUp" menu.
5.3.3.  - Deleting Categories and Groups - Deleting Categories and Groups
For this example, the following assumption has been made:
- A category which was needed to structure health units is outdated. It has to be removed.
Starting from the "SetUp" menu (compare figure 5.1-1), you have to take the following steps to delete a category and the according groups:
1. Choose the option "Define Groups" from the "SetUp" menu. "Kabarole!" will display the screen "Define Groups of Health Units" (compare figure 5.1-8).
2. Highlight the category which has to be deleted in the "Categories" box. "Kabarole!" will display the according groups in the "Groups" box.
3. Press <Del> when the correct category is highlighted. "Kabarole!" will ask whether to delete the category (compare figure 5.1-10).
4. Choose the option "Yes" from the message. "Kabarole!" will:
- Delete all the groups of that category.
- Delete all the assignments of health units to the according groups.
- Delete the category.
- Return the highlighted bar to the "Categories" box.
5. Press <Esc> to leave the screen "Define Groups of Health Units". "Kabarole!" will return to the "SetUp" menu.
5.4. Defining Services
5.4.1.  - Creating a New Service - Creating a New Service
For this example, the following assumption has been made:
- A new health service was introduced to the district. It has to be installed in "Kabarole!".
- The health units have been installed in "Kabarole!" already.
Starting from the "SetUp" menu (compare figure 5.1-1), you have to take the following steps to create a new service:
1. Choose the option "Define Services" from the "SetUp" menu. "Kabarole!" will display the
screen "Define Services of the Health Units" (compare figure 5.1-11).
2. Highlight the option "create new service" in the "Services" box.
3. Press <Enter> when the option "create new service" is highlighted in the "Services" box.
"Kabarole!" will replace the option "create new service" with the entry field for the name of the new service.
4. Enter a name for the new service. "Kabarole!" will display the district map for assigning health units
to a service, which looks similar to the district map for assigning health units to a group (compare figure 5.1-9).
5. Click the mouse button on each health unit, which provides the new service. "Kabarole!" will mark the selected health units on the district map.
6. Press <Esc> to leave the district map. "Kabarole!" will return to the screen "Define Services of the Health Units".
7. Press <Esc> to leave the screen "Define Services of the Health Units". "Kabarole!" will return to the "SetUp" menu.
5.4.2.  - Assigning Services to a Health Unit - Assigning Services to a Health Unit
For this example, the following assumptions have been made:
- A new health unit has been installed in "Kabarole!".
- The services which are provided by the health unit have to be assigned to the health unit.
- The health services which are provided in the district have been installed already.
Starting from the "SetUp" menu (compare figure 5.1-1), you have to take the following steps to assign services to the health unit:
1. Choose the option "SetUp Health Units" from the "SetUp" menu. "Kabarole!" will display the district map for setting up health units (compare section 5.1.2. "The District Map for Setting Up Health Units").
2. Click the mouse button on the health unit. "Kabarole!" will display the "ModifyUnit" menu (compare figure 5.1-3)
3. Choose the option "Enter Target Population" from the "ModifyUnit" menu. "Kabarole!" will
display the screen "Enter Target Population" (compare figure 5.1-5).
4. Highlight the option "assign another service" in the "Provided Services" box.
5. Press <Enter> when the option "assign another service" is highlighted in the "Provided Services" box.
"Kabarole!" will display the list of available services (compare figure 3.1-7) on the screen with all the services, which were not assigned to the health unit, yet.
6. Highlight a provided service in the list of available services. "Kabarole!" will:
- Append the selected unit in the "Provided Services" box.
- Highlight the option "enter new value" in the "Target Population" box.
7. Press <Enter>. "Kabarole!" will move the cursor to the entry field for the target population of the selected year.
Do step eight if the target population is known:
8. Enter the target population for the selected year. "Kabarole!" will add a new line for the target population of the following year.
9. Press <Esc> to return to the "Provided Services" box. "Kabarole!" will move the highlighted bar to the selected service in the "Provided Services" box.
10. Repeat steps 4 to 9 for each service that has to be assigned.
11. Press <Esc> to leave the screen "Enter Target Population". "Kabarole!" will return to the district map for setting up health units.
12. Press <Esc> to leave the district map for setting up health units. "Kabarole!" will return to the "SetUp" menu.
5.4.3.  - Deleting a Service - Deleting a Service
For this example, the following assumption has been made:
- A service was installed by accident. It has to be removed.
Starting from the "SetUp" menu (compare figure 5.1-1), you have to take the following steps to delete a service:
1. Choose the option "Define Services" from the "SetUp" menu. "Kabarole!" will display the
screen "Define Services of the Health Units" (compare figure 5.1-11).
2. Highlight the service which has to be deleted in the "Services" box.
3. Press <Del> when the correct service is highlighted. "Kabarole!" will ask whether to delete the service (compare figure 5.1-12).
4. Choose the option "Yes" from the message. "Kabarole!" will:
- Delete all the assignments of health units to that service.
- Delete all according target populations.
- Delete the service.
- Return the highlighted bar to the "Services" box.
5. Press <Esc> to leave the screen "Define Services of the Health Units". "Kabarole!" will return to the "SetUp" menu.
5.5. Defining Data Entry Forms
5.5.1.  - Creating a New Data Entry Form - Creating a New Data Entry Form
For this example, the following assumptions have been made:
- A new report form was introduced to the district. It has to be installed in "Kabarole!" as a data entry form.
- The new report form is not an update of a report form which is already installed in "Kabarole!". Otherwise refer to section 5.5.2. "Updating an Existing Data Entry Form".
- The "EpiInfo" modules "Eped" and "Enter" are available.
You have to take the following steps to install a new data entry form:
1. Design the data entry form with the "Eped" module of "EpiInfo". Be aware of the exemptions in section 5.1.8. "The 'EpiInfo' Questionnaire Files".
2. Save the file with the extension "QES" in the "Kabarole!" directory "EPI-REC". Be aware,
that "Kabarole!" uses the file name for identification of the form after installation.
3. Save the same file again with the extension "TXT" in the "Kabarole!" directory "EPI-REC".
4. In the "TXT" file, replace all "#" symbols with an understroke ("_").
5. Print the "TXT" file.
6. Save the modified "TXT" file again.
7. Start the "Enter" module of "EpiInfo".
8. In the "Enter" set up, change the default data file path to the "Kabarole!" directory "EPI-REC".
"EpiInfo" will use this path to store the resulting record file.
9. Create a new data file from the questionnaire file. Give the same file name with the extension
"REC" to the data file, as you have given to the questionnaire file. "EpiInfo" will display the data entry screen (compare figure 5.1-18).
10. Denote the variable names of all the entry fields in the printout from step 5.
11. Leave the data entry screen by pressing <F10>. "EpiInfo" will save the record file in the "Kabarole!" directory "EPI-REC".
12. Start "Kabarole!" and go to the "SetUp" menu. Compare figure 5.1-1.
13. Choose the option "Define Data Entry Forms" from the "SetUp" menu. "Kabarole!" will
display the screen "Define Forms for Data Entry" (compare figure 5.1-13).
14. Highlight the option "add a new form" in the "Existing Forms" box.
15. Press <Enter> when the option "add a new form" is highlighted in the "Existing Forms" box.
"Kabarole!" will display the list of available "EpiInfo" record files (compare figure 5.1-14).
15. Highlight the "EpiInfo" record file which you have created in steps 7 to 11.
16. Highlight the option "Open" in the box with the list of available "EpiInfo" record files.
17. Press <Enter> when the option "Open" and the desired "EpiInfo" record file are highlighted. "Kabarole!" will:
- Add the chosen file name in the "Existing Forms" box.
- Place the cursor in the entry field for the reporting frequency.
18. Enter the reporting frequency. "Kabarole!" will move the cursor to the entry field for the descriptive name of the form.
19. Enter the descriptive name. "Kabarole!" will install the form.
20. Press <Esc> to leave the screen "Define Forms for Data Entry". "Kabarole!" will return to the "SetUp" menu.
5.5.2.  - Updating an Existing Data Entry Form - Updating an Existing Data Entry Form
For this example, the following assumptions have been made:
- A new version of an existing report form was introduced to the district. The old form has to be updated in "Kabarole!".
- The old version of the report form is already installed in "Kabarole!". Otherwise refer to section 5.5.1. "Creating a New Data Entry Form".
- The "EpiInfo" modules "Eped" and "Enter" are available.
You have to take the following steps to update an existing data entry form:
1. Load the "EpiInfo" questionnaire file of the old version into the "Eped" module of "EpiInfo".
2. Modify the file according to the new version of the report form. Be aware of the exemptions in section 5.1.8. "The 'EpiInfo' Questionnaire Files".
3. Save the file with the extension "QES" and the same file name as the old file in the "Kabarole!" directory "EPI-REC".
4. Save the same file again with the extension "TXT" in the "Kabarole!" directory "EPI-REC".
5. In the "TXT" file, replace all "#" symbols with an understroke ("_").
6. Print the "TXT" file.
7. Save the modified "TXT" file again.
8. Start the "Enter" module of "EpiInfo".
9. In the "Enter" set up, change the default data file path to the "Kabarole!" directory "EPI-REC".
"EpiInfo" will use this path to store the resulting record file.
10. Revise structure of data file using the revised questionnaire file. Give the same file name with
the extension "REC" to the data file, as you have given to the questionnaire file. "EpiInfo" will display the data entry screen (compare figure 5.1-18).
11. Compare the variable names of all the entry fields with the documentation of the old version of the form. Be aware of the remarks about variable names in section 5.1.9. "The 'EpiInfo' Record Files".
Do step 12 only, if the names of the entry fields in the updated version of the form will not cause inconsistencies in your data base:
12. Denote the variable names of all the entry fields in the printout from step 6.
13. Leave the data entry screen by pressing <F10>. "EpiInfo" will save the record file in the "Kabarole!" directory "EPI-REC".
Do steps 14 to 20, if the new names of the entry fields will cause problems in your data base:
14. Load the updated "EpiInfo" record file into the "Eped" module of "EpiInfo".
15. Adapt the corrupted variable names to the desired names.
16. Save the corrected "EpiInfo" record file with the same name as you loaded it.
17. Start the "Enter" module of "EpiInfo" for normal data entry.
18. Compare the variable names of all the entry fields with the documentation of the old version of the form. Be aware of the remarks about variable names in section 5.1.9. "The 'EpiInfo' Record Files".
Do step 19 only, if the names of the entry fields in the updated version of the form will not cause inconsistencies in your data base:
19. Denote the variable names of all the entry fields in the printout from step 6.
20. Leave the data entry screen by pressing <F10>. "EpiInfo" will save the record file in the "Kabarole!" directory "EPI-REC".
Repeat steps 14 to 20, if the new names of the entry fields will cause problems in your data base:
21. Start "Kabarole!" and go to the "SetUp" menu. Compare figure 5.1-1.
22. Choose the option "Define Data Entry Forms" from the "SetUp" menu. "Kabarole!" will
display the screen "Define Forms for Data Entry" (compare figure 5.1-13).
23. Highlight the form that you want to update in the "Existing Forms" box.
24. Press <Enter> when the desired form is highlighted in the "Existing Forms" box. "Kabarole!"
will display the list of available "EpiInfo" record files (compare figure 5.1-14) with the updated "EpiInfo" record file as only choice.
25. Highlight the option "Open" in the box with the list of available "EpiInfo" record files.
26. Press <Enter> when the option "Open" and the updated "EpiInfo" record file are highlighted.
"Kabarole!" will place the cursor in the entry field for the reporting frequency of the form that you selected for updating.
27. Press <Enter>. "Kabarole!" will move the cursor to the entry field for the descriptive name of the form.
28. Press <Enter>. "Kabarole!" will update the form.
29. Press <Esc> to leave the screen "Define Forms for Data Entry". "Kabarole!" will return to the "SetUp" menu.
5.5.3.  - Deleting a Data Entry Form - Deleting a Data Entry Form
For this example, the following assumptions have been made:
- A data entry form was installed by accident. It has to be removed.
- No reports have been entered for the form, yet.
Starting from the "SetUp" menu (compare figure 5.1-1), you have to take the following steps to remove a data entry form:
1. Choose the option "Define Data Entry Forms" from the "SetUp" menu. "Kabarole!" will display
the screen "Define Forms for Data Entry" (compare figure 5.1-13).
2. Highlight the form which you want to delete in the "Existing Forms" box.
3. Press <Del> when the desired form is highlighted in the "Existing Forms" box. "Kabarole!" will display a message to confirm the action (compare figure 5.1-15).
4. Choose the option "Delete" from the message. "Kabarole!" will remove the form.
5. Press <Esc> to leave the screen "Define Forms for Data Entry". "Kabarole!" will return to the "SetUp" menu.
|


